# Image
# Introduction
When loading large images on the frontend, the following measures can be taken to speed up loading:
- Image compression: Compressing images can significantly reduce file size and shorten load time. When compressing, maintain image quality to avoid affecting display.
- Image tiling: Splitting large images into smaller tiles avoids loading the entire image at once and speeds up loading. This requires frontend tile stitching and seamless assembly.
- CDN acceleration: Using a CDN (Content Delivery Network) caches images on nodes closer to users, speeding up delivery. Static images can be stored on a CDN for faster access.
- Lazy loading: Lazy loading defers image loading until the user scrolls to them, avoiding loading many images at once and slowing the page.
- WebP format: WebP can reduce image size to less than half of JPEG and PNG, speeding up loading.
- HTTP/2: HTTP/2 allows parallel loading of multiple images, improving page load speed.
- Preloading: Preloading fetches resources needed for the next step after the page loads. For images, you can preload the next image to display for faster browsing.
For images of hundreds of MB or several GB, instant loading is impractical even with optimization. The second approach above—image tiling—is the best solution.
VJMap supports common image formats such as tif;png;jpeg;tiff;hdr;avif;webp;jpe;jpc;jpg;heif;bmp;dib;heic;jfif;gif;zip;hif;pdf;. After uploading an image, the backend processes and tiles it, enabling instant display on the frontend.
# Image Tiling Overview
Image tiling is the process of splitting a large image into smaller tiles for storage and processing. It is commonly used in web maps, tile maps, and image mosaics.
The tiling process typically includes:
- Define tile size: Set the size of each tile, usually square or rectangular.
- Calculate tile count: Based on tile size, compute how many tiles are needed. Formula: tile count = image width / tile width × image height / tile height.
- Slice the image: Split the image into the calculated number of tiles using an image library or custom code.
- Store tiles: Save tiles to disk in formats such as JPEG or PNG.
- Load tiles: Load the required tiles where needed and assemble them into the full image.
Tiling reduces the complexity of handling large images and improves load speed, so users can view details faster. It is widely used where large images must be processed and displayed efficiently.
# Image Map Extent Settings
Some image maps have an associated geographic extent. Set this extent when uploading the image or afterward.
For example, TIFF images often have a corresponding TFW file with geographic extent.
TIFF/TFW, JPG/JPGW world file format (6 parameters)
0.030000
0.0000000000
0.0000000000
-0.030000
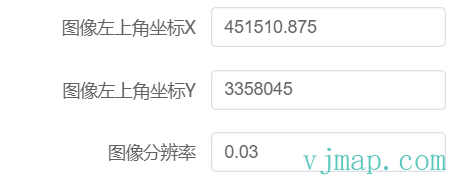
451510.875000
3358045.000000
2
3
4
5
6
7
8
9
10
11
Meaning of each line:
- X resolution scale of one pixel in the X direction.
- Translation.
- Rotation.
- Negative of the Y resolution scale of one pixel in the Y direction.
- X coordinate of pixel (1,1) (top-left).
- Y coordinate of pixel (1,1) (top-left).
When uploading, set the map extent using the first, fifth, and sixth values from the file:
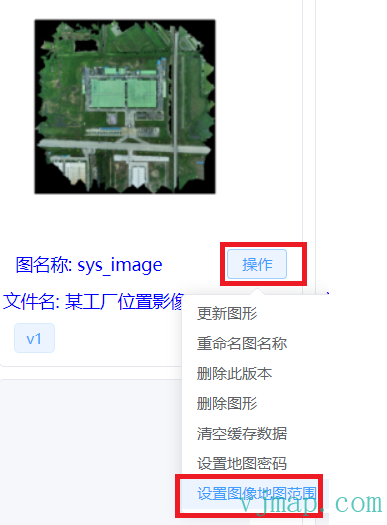
Or after upload, click Set Map Extent in the operation menu:
# Image Processing
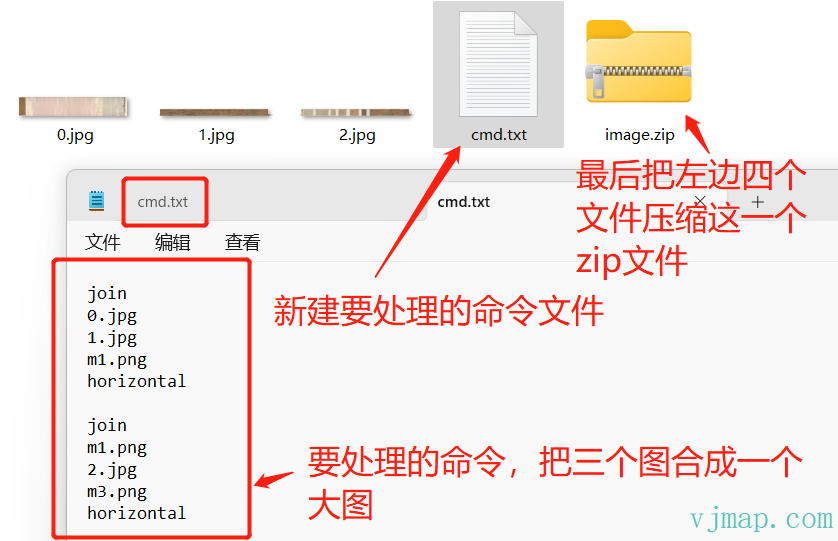
To rotate, stitch, or otherwise process images before tiling, create a cmd.txt file with the processing commands, then package it with the images into a ZIP file for upload.
To stitch 1.jpg and 2.jpg into m1.png, use the following in cmd.txt:
join
1.jpg
2.jpg
m1.png
horizontal
2
3
4
5
Then package 1.jpg, 2.jpg, and cmd.txt into a ZIP file and upload.
Example source images:

To stitch these three files into one, create cmd.txt in the same directory with:
join
0.jpg
1.jpg
m1.png
horizontal

join
m1.png
2.jpg
m3.png
horizontal
2
3
4
5
6
7
8
9
10
11
Then package 0.jpg, 1.jpg, 2.jpg, and cmd.txt into image.zip (you can choose the archive name) and upload it.
cmd.txt format:
command_name_1
command_name_1_param_1
command_name_1_param_2

command_name_2
command_name_2_param_1
command_name_2_param_2
command_name_2_param_3

command_name_3
command_name_3_param_1
2
3
4
5
6
7
8
9
10
11
- Separate multiple commands with blank lines.
- Separate command names and parameters with line breaks.
# Image Processing Commands
# Rotate Image
rot
in - Input image filename
out - Output image filename
angle - Rotation angle. Default: d90. Allowed: d0, d90, d180, d270
2
3
4
Example: rotate 1.jpg by 90 degrees before tiling.
In cmd.txt:
rot
1.jpg
result.jpg
d90
2
3
4
result.jpg can be any name (letters or numbers only). Package 1.jpg and cmd.txt into a ZIP file and upload.
# Crop Image
Crop by specifying top-left coordinates and crop width and height.
crop
in - Input image filename
out - Output image filename
int left
int top
int width
int height
2
3
4
5
6
7
# Resize Image
resize
in - Input image filename
out - Output image filename
scale - Scale factor. e.g. 2 = 2×, 0.5 = half size
2
3
4
# Flip Image
flip
in - Input image filename
out - Output image filename
direction - horizontal or vertical
2
3
4
# Affine Transform
affine
in - Input image filename
out - Output image filename
"2 0 0 1" - 2×2 transform matrix as four space-separated numbers
2
3
4
# Join Images
join
in - First input image filename
in - Second input image filename
out - Output image filename
direction - horizontal or vertical
2
3
4
5
# Image Array
Merges multiple files or files matching a wildcard into one array. Often used to stitch multiple images into one or merge channels into a multi-channel image.
arrayjoin
image1.jpg
image2.jpg
image3.jpg
... (more input files)
output.jpg
2
3
4
5
6
# Image Format Support (Backend Config)
Add supportImageFormat under the map section in config.json:
{
    "map" : {
      "supportImageFormat": "jpc;tif;tiff;png;jpg;jpeg;jpe;jfif;bmp;dib;gif;pdf;hdr;webp;heic;hif;heif;avif;zip",
      "supportImageFileMinSize": 0,
      "supportImageFileMaxSize": 0
    }
}
2
3
4
5
6
7
supportImageFormat: Supported file types. Add, remove, or modify formats as needed.supportImageFileMinSizeandsupportImageFileMaxSize: Min and max upload size in bytes.0means no limit.
Restart the service after changing these parameters.
# Implementation
# Preview
# Upload and Open Image
Upload a large image for backend tiling. Example upload code:
async onChangeFile(file) {
            try {
                message.info('Uploading file...')
                this.isSelectFile = false;
                this.uploadMapResult = await svc.uploadMap(file.raw);
                if (this.uploadMapResult.error) {
                    message.error('Upload failed: ' + this.uploadMapResult.error)
                    return
                }
                this.form.mapid = this.uploadMapResult.mapid;
                this.form.uploadname = this.uploadMapResult.uploadname;
                this.maptype = this.uploadMapResult.maptype || '';
                this.dialogVisible = true;
            } catch (error) {
                console.error(error);
                message.error('Upload failed.', error)
            }
        }
2
3
4
5
6
7
8
9
10
11
12
13
14
15
16
17
18
To process images after upload, create a cmd.txt with the commands and package it with the images in a ZIP file.
To stitch 1.jpg and 2.jpg into m1.png, use in cmd.txt:
join
1.jpg
2.jpg
m1.png
horizontal
2
3
4
5
Then package 1.jpg, 2.jpg, and cmd.txt into a ZIP file and upload.
Open image code:
async onOpenMap() {
            try {
                let mapid = this.form.mapid;
                let param = {
                    ...this.uploadMapResult,
                    // Map ID
                    mapid: this.form.mapid,
                    // fileid from upload
                    fileid: this.uploadMapResult.fileid,
                    // upload filename
                    uploadname: this.form.uploadname,
                    // Map open mode (e.g. "Open directly" -> Memory, else GeomRender)
                    mapopenway: this.form.openway === "直接打开图形" ? vjmap.MapOpenWay.Memory : vjmap.MapOpenWay.GeomRender,
                    // Secret key for password-protected map
                    secretKey: this.form.isPasswordProtection ? svc.pwdToSecretKey(this.form.password) : undefined,
                    style: vjmap.openMapDarkStyle(), // use dark style when container has dark background
                    // Image type: top-left coords and resolution
                    imageLeft: this.form.imageLeft ? +this.form.imageLeft : undefined,
                    imageTop: this.form.imageTop ? +this.form.imageTop : undefined,
                    imageResolution: this.form.imageResolution ? +this.form.imageResolution : undefined,
                }
                let isVectorStyle = this.form.openway === "存储后渲染矢量";
                await openMap(param, isVectorStyle);
            } catch (error) {
                console.error(error);
                message.error('Failed to open map.', error)
            }
        }
2
3
4
5
6
7
8
9
10
11
12
13
14
15
16
17
18
19
20
21
22
23
24
25
26
27
28
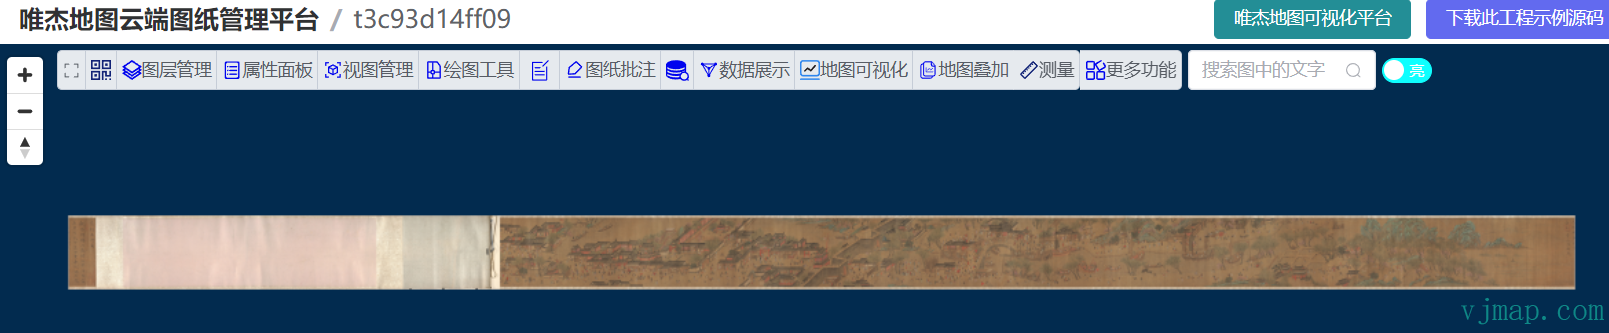
# Use Cases
# Case 1: Stitch Images and View on Frontend
Source images:
Result:
# Case 2: Tile TIFF Imagery and Overlay with CAD for Calibration
When uploading TIFF imagery, you can set the geographic extent.
TIFF/TFW, JPG/JPGW world file format (6 parameters)
0.030000
0.0000000000
0.0000000000
-0.030000
451510.875000
3358045.000000
2
3
4
5
6
Meaning of each line:
- X resolution scale of one pixel in the X direction.
- Translation.
- Rotation.
- Negative of the Y resolution scale of one pixel in the Y direction.
- X coordinate of pixel (1,1) (top-left).
- Y coordinate of pixel (1,1) (top-left).
Set the map extent using the first, fifth, and sixth values when uploading:
Or after upload, click Set Map Extent in the operation menu:
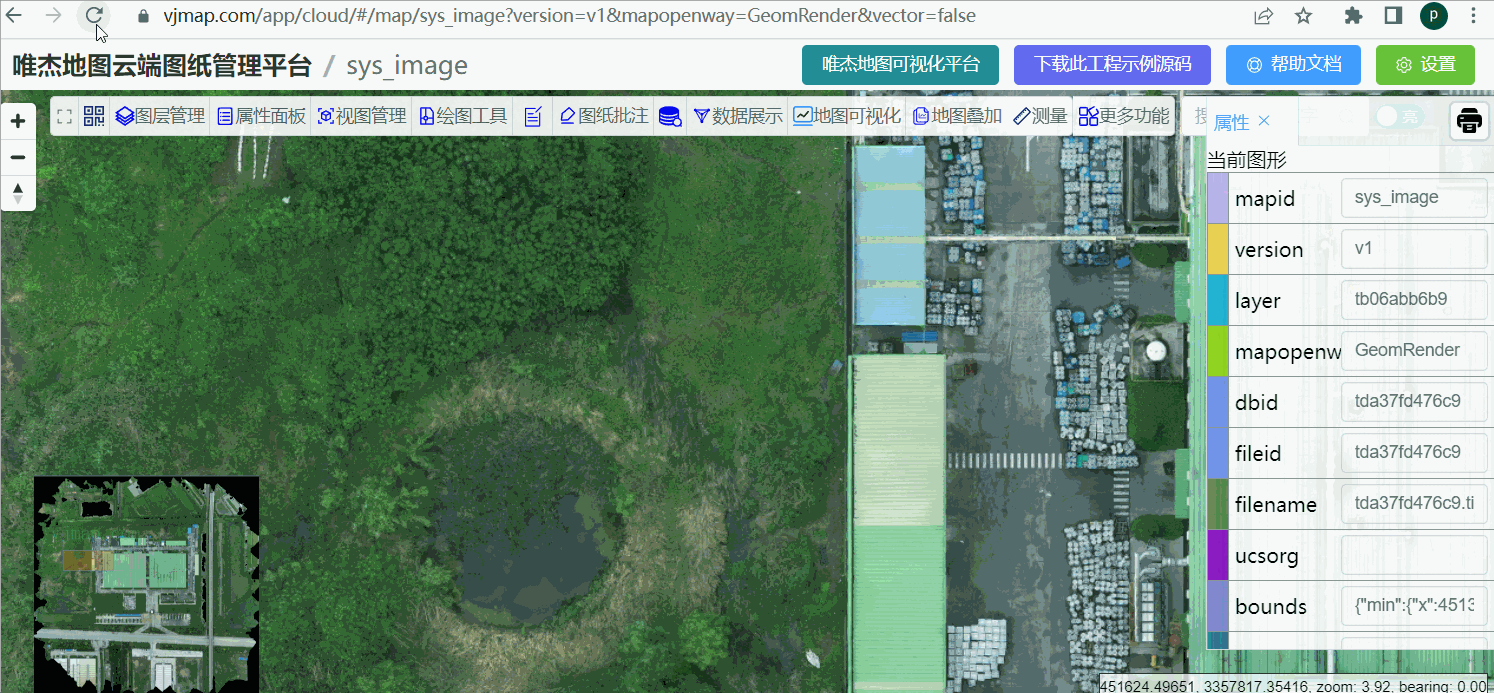
After tiling, the imagery can be overlaid and calibrated with CAD. Result:

Try it: https://vjmap.com/demo/#/demo/map/comprehensive/04imagecadmap (opens new window)
# imageproc Source Code
main.go
package main

import (
    "fmt"
    "os"
    "os/exec"
)

func main() {
    // Path to the exe to run
    cmdPath := os.Args[1]
    // Arguments to pass
    args := os.Args[2:]

    // Run command
    cmd := exec.Command(cmdPath, args...)
    output, err := cmd.CombinedOutput()
    if err != nil {
        fmt.Println("ERROR_MSG:", err.Error(), string(output))
    } else {
        // Output result
        fmt.Println(string(output))
    }
}
2
3
4
5
6
7
8
9
10
11
12
13
14
15
16
17
18
19
20
21
22
23
24
25